3ds Max Diorama
This tutorial details the process of creating a digital ‘diorama’ using 3ds Max 2011.
The basic idea is to map images onto 2-dimensional planes, and arrange the planes in 3-dimensional space to form the illusion of 3d objects in space. It is sometimes also necessary to make certain parts of the mapped images transparent, isolating one object in the image.
The technique can be used by itself to create an entire scene, or can be used to supplement a more complex scene.
- Using the internet or your own photos, choose images to use in your scene.
- Be sure to choose an image with a medium or high resolution (depending on the intended use).
- Prepare your images in photoshop.
- Select the part of the image you wish to be visible.
- Create a new layer and fill your selection with white.
- Create a new layer behind this one and fill the entire layer with black.
- Save the black and white image as a new jpeg.
- Be sure to “save as” so you don’t write over your original image.
- This will tell 3ds Max which parts of your plane should be transparent.
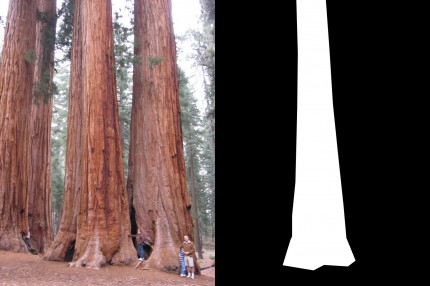
 This is an example of an image to be mapped to a plane, and an opacity mask used to hide all but one tree.
 - In 3ds Max, create a plane and map the image onto it via a new material.
- Create a plane sized so its aspect ratio equivalent to your image.
- So if your image is 300×400 pixels, your plane could be 300″x400″, 6’x8′, or any other equivalent size.
- To map your image onto the plane:
- Press ‘m’ to open the material editor.
- Create a new standard material by double-clicking on the ‘standard’ material, under the ‘standard’ category, in the material browser on the left-hand side of the material editor.
- Select your plane in the scene. In the material editor, select the new standard material and hit the ‘assign material to selection’ button in toolbar at the top.
- You should also enable ‘show standard map in viewport’ at the top of the material editor.
- Drag your original image into the material editor, which creates a new ‘map’ for that image.
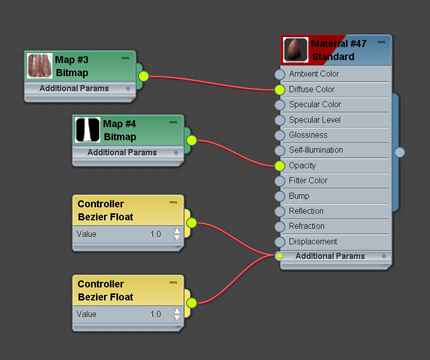
- Drag a wire from the small dot on the right side of the map to the diffuse node of your material.
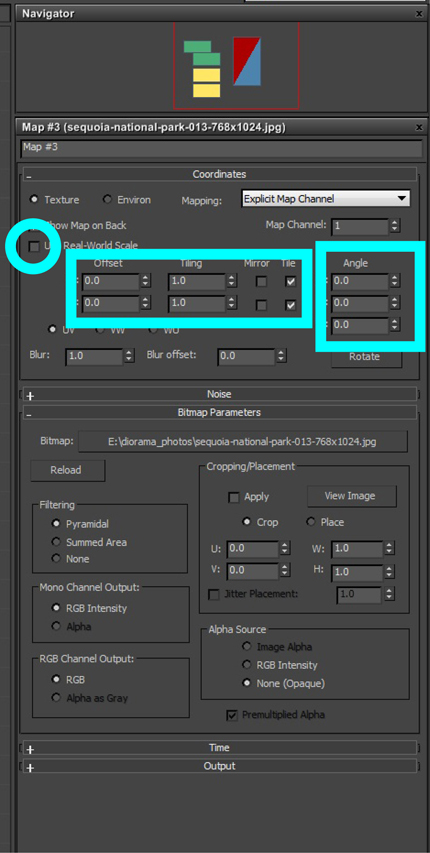
- You should now see your image on the plane. If it is oriented incorrectly, double click on the image map and change the U, V, or W values under ‘angle’ until it is oriented correctly. If it is sized incorrectly, try turning on or off ‘use real-world scale’, and adjust the size appropriately.
- Repeating this process, drag your black and white image into the material editor to create a map.
- Drag a wire from the new map to the opacity node of your material.
- You should now see only the desired portion of the image on the plane. If you changed the orientation of your diffuse map, change the opacity map to match it
- Create a plane sized so its aspect ratio equivalent to your image.
In the material editor, double-click the panel for the image mapped to your diffuse channel. Adjust these parameters until the image shows up correctly on your plane.

A standard material with images masked to the diffuse and opacity nodes. The ‘controller bezier float’ panels are created automatically.
- Position and rotate the plane, according to how it will be used.
- In the toolbar, enable ‘angle snap toggle’ to limit rotation to 5-degree intervals. (You can change this interval by right-clicking on the button.)
- Press ‘e’ to select the rotation transform tool.
- Using the tool, select the appropriate axis and rotate your plane.
- Position the plane using the move transform tool.
- Repeat the above process to create and place all of the elements of your scene.
An example of a diorama made in 3ds Max:
Project 01. Swamp Diorama . Paul Toenjes from Bradley Cantrell on Vimeo.
For more help with the material editor, see this video.
For more help with creating and animating cameras, see this video.

