LA 2101 : Project 5.0 – Preparing your model for the 3D printer
This tutorial explains how to prepare your file for the 3D printer
Once you are done with the digital model of your landscape, it is time to prepare your file for the analog model.
- At first you have to decide which components of your digital model you will use to create your analog model.
- Open your file and save it under a different name, since you will delete some geometry
- Select all the objects you do not want the 3D printer to model and delete them
- Easy ways to do this is either select by name (h) or freezing your terrain and then drag a selection over the objects you want to delete
- Your scene should now contain your terrain and some simple objects that can be printed
- There are two ways of preparing the model for the 3D printer
- 1.
- Select your terrain and copy it by pressing ALT+V (this will create a copy without moving it)
- Scale the copied version down (on the X and Y axis) , so you can use it to hollow out your terrain
- If not already, align the bottom of the scaled terrain with the one of the original
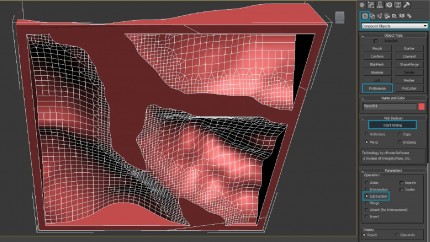
- Select the original terrain, go to the create panel\compound objects and choose “pro boolean”
- Click on the start picking button under “pick boolean”, and click on the copied terrain
- Make sure that “subtraction” in the “parameters” roll-out is selected
- Now your model should be hollowed out and look somewhat like this
- 2.
- Select you terrain and navigate to the modify panel, make sure it is a single object ( edit poly)
- If your model has a capped bottom, go to “polygon” sub-object mode and delete the bottom cap
- Go out of sub-object mode and and apply a “shell” modifier to you terrain.
- Make sure you use”inner amount” for the shell modifier, since you do not want you model to increase in overall size
- A minimum value for the shell thickness is 0.2″
- Be aware that the thicker your model is the more durable it will be


[…] Preparing a model for the 3D printer Previous article Next article […]